You need:
1 yard each of 2 coordinating fabrics
1 yard 6 inches for the ruffle and handle
some Velcro
matching thread
anything you want to add some blitz the cover:) EX: silk flowers, appliques, ribbon, etc.
From the 2 coordinating fabrics cut out a square that is 30 X 38
From the ruffle fabric cut 7 strips that are 5 X 42 AND cut four pieces that are 4 X 12 inches (if you are NOT making it reversible, just cut 2 strips).
Round the corners on your 30 X 38 squares. I traced a CD cover case.
Add any appliques or embellishments you want to the panel. I put mine in the lower right corner.
For the ruffle, sew your strips end to end until you have one long strip 5 X 294. With wrong sides together, fold in half horizontally and iron flat.
So here is the fun part. Sew the remaining 2 ends of the ruffle strip together so you have a big circle. Make sure the fabric is not twisted. Ruffle/ gather the fabric. remember if you are gathering it by hand, to keep your threads long. Turn your tension up on your machine as high as it will go. Increase your stitch length to the longest length. Start sewing on the open edge of the ruffle strip. At every seam, stop, cut the threads long, and start again where you left off.
Once you have gathered the ruffle, sandwich the ruffle between the 2 fabric rectangles. Making sure the ruffle fold goes toward the middle of the fabric. Sew closed, leaving a hole for turning. I recommend making sure the hole is on a straight edge not the curve. It will be a lot easier to make it uniform.
Turn right side out and sew opening closed. (you can hand stitch it, but I am lazy and just used my machine. It's hard to see but if you look closely, you can see my straight stitch to close the hole;)
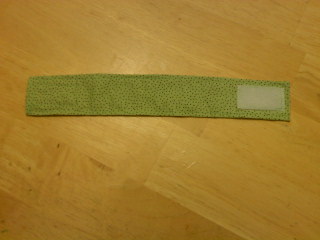
For the handle take your 4X12 strips. With right sides together, fold in half length wise. Leave one end open.
Turn right side out. Flip the open end inside and top stitch around the entire piece. Making sure to stitch closed the open end.
Sew Velcro onto the end. Making sure each piece is on the opposite side.
Fold the blanket in half and measure 4 1/2 inches up from middle and 8 1/2 inches in from the sides. Place middle of strap at the 4 1/2 inch mark. Match the straps for the opposite side by measuring and using the pins as a guide:)
Sew a big square with an X in the middle to secure the straps. How big your square is depends one how tight you want the straps on the car seat handle.
Add some bling to the top of the strap to cover the Velcro marks and to make it a little extra special!

Step back and admire your handy work. All things girly! LOVE IT!


7 comments:
What a nice tutorial! I'll be bookmarking and sending along to my SIL. She's expecting a little girl soon, and this would be perfect. Thank you.
Yay!!! My sis is expecting next month and I had intended to make her one of these. Yours is so cute and the tutorial is fantastic I can't wait to get to the fabric store!!
This is a GREAT tutorial!!
I can't wait to make one of these. I've been waiting for a great tutorial. Thanks
This is an awesome idea!! It would make such a cute baby shower gift!:)
Thanks for sharing!!
This is so very cute! Thanks for sharing it with us!
This is so cute and looks to be easy and fast. Thanks so much for sharing.
Colorcrazed Custom Fabrics
BOLD - The FREE E-zine for Blogging enthusiasts
Post a Comment