Showing posts with label Tutorials. Show all posts

Thursday, February 16, 2012

Ruffle Dress Tutorial

FYI: I corrected the spelling on the pirate treasure hunt. Sorry about that friends.

Supplies:
1 yard ruffle fabric
1 yard silky liner


I used a pattern from Burda that use to be free, but I can't find it anymore. You can easily use THIS free pattern though because they are so similar.

*Cut out 2 pattern pieces from ruffle fabric for the front and back of dress
*Cut out 2 strips from ruffle fabric that are 1 1/2 inches X 8 inches (the length may vary depending on how tall the little girl is. I wanted mine shorter, so I had to cut the length down to about 4 inches to fit my daughter).
*Cut out 2 pattern pieces from silky liner


Here is the fun part

With Right sides together, sew the straps into a tube. Flip right side out. Set aside.

Take the 1 lining and 1 ruffle piece and pin right sides together. Sew just the arm and top of dress leave sides open. (only along black line in picture)


Snip around the curve of arm


Flip right side out and top stitch along on where you have just sewn. Repeat with remaining lining and ruffle piece.


Take both body pieces and pin right sides together. Sew along the both sides of dress. I surged along the edges to make them look more finished.


Pin the straps and the top. Adjusting the length as needed for child. Sew in place. Hem the bottom of the dress by folding edge over 1/2 inch and fold again another 1/2 inch. Sew in place.


Now you have an easy frilly dress for the little your woman.

Tuesday, February 14, 2012

Magical Day of Make Believe

I wanted to do something fun for Valentine's Day for my kids. So, I decided to turn it into a Magical Day of Make Believe.


Ahoy there me hearties! It's a pirates life for me. It's time to begin our treasure hunt. A grand treasure has been hidden is this here lands and it's our job to find it.

I have made some simple clues for younger children. The average house should have these places to hide clues. You can find a zipped file of the clues HERE. The Treasure will be hid in your car with the pirate flag.

The first thing is to have the kiddos dress up like pirates! The Dollar store has lots of accessories for this;)


Now have the kids make the treasure map!
1: Gather supplies
2: Rip out shape of map
3: roll into a ball
4: Open and spritz with water
5: roll into a ball again and work with the paper until it is soft
6: Let dry in the sun
7: Draw the treasure map

Have the kids find the 'treasure' by following the clues! Good luck mate!

I found THIS cute printable for a treasure map. You could cut the paper bag to the size of a piece of paper and print it on that, but I think it's fun to have the kids make their own and let them color this page!

Thursday, December 22, 2011

Magical Day Of Make Believe #2

"Off we go to explore the moon." (That's a quote from a children's show my daughter watches, but at this moment I can't remember the name of it.)

This week is outer space. I kept this one simple.
First we made a mobile of our solar system. Download HERE.

or Martha Stewart has instructions to make one found HERE (I have a toddler so this was a bit more complicated then I was going for)


We sat in our "rocket ship" (chairs laying on the ground) and blasted off into outer space. Remember there is no gravity in space so we moved silly and jumped really high;) Then we looked at the planets in our solar system and talked about them. You can download the planets and information HERE.

Magical Day of Make Believe will placed on hold through the Holidays. It will start again when my son goes back to school Jan 16th. Yes you read that right. Can I just say who the heck planned this Holiday break. They don't get out of school until Dec 23rd. I would have way rather get out a week earlier and started a week sooner.

Monday, December 5, 2011

African Safari

Welcome to the first of the Magical Day of Make-believe series, where play time is fun for everyone. Let's go on an African Safari. Have an adult or older sibling who can read be the tour guide. (download HERE).
Every great explorer needs his gear. A must have are binoculars.

Most importantly, we need animals! (download HERE).
Cut out the animals. If you want to re-use them laminate the pictures. Hang the pictures of the animals at the kid's eye level. This is a great activity for a park (if weather won't permit, just do it around the house). For older children, make them harder to find. Have the children search with their 'binoculars' to find an animal. Once an animal is spotted, as a tour guide it is your responsibility to tell a little bit about the animal;)

After all the animals have been found, gather round the campfire for snacks of animal cookies and milk.

Monday, October 10, 2011

Angry Bird Costume

I tried to talk my son into being a skeleton for Halloween. I have wanted to be a family of skeletons for a year. Anyway, my daughter was all for it, but my son refused. So, I changed my direction.

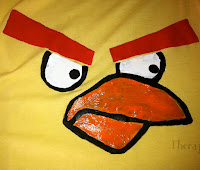
My son is obsessed with angry birds. This was a lot easier to do then I originally thought. It turned out awesome and I am soooooooo excited! And to be honest I was not loving the angry bird costumes for sale. They just look uncomfortable and weird.


First gather your supplies. I got plain colored t-shirts in the color of the birds we wanted to be. I got 2 sizes bigger then we normally wear so we could stuff them a little. It is too hot here to put a lot of stuffing so if you want it bigger, go bigger:)  Hubby is red, son is black, mommy is yellow, daughter is pink pig (there is no pink pig, but she just wanted punk.  Plus I put a crow on her to be the 'queen' pig so just pretend she is in green).

You can use freezer paper and make a stencil and paint it on, use t-shirt vinyl, or use felt and sew the face on. I just hand drew the faces. I have included my drawings. I cleaned them up in Photoshop! If you would like to use them just click on the links below.

Black Angry Bird (black tail feathers)
Yellow Angry Bird (black tail and head feathers)
King Pig (I put on a squiggly pig tail)

I bought hubbies shirt at Wal-mart and it already had the angry bird face on it. So that is why there is no red angry bird pattern:)
Red Angry Bird (red head feathers, black tail feathers)


Cut out the faces you want and put on the front of your shirt. I made stencils from freezer paper and painted them on.


Make a casing at the very bottom of the shirt. I opened a little part of the hem and threaded elastic through it. Then sewed the opening closed again. This is to keep the stuffing from falling out:)


Make the tail feathers. I drew a pattern first then cut 2 pieces out of felt. I didn't include the hand drawn patterns for the tail or head feathers.


Sewed the 2 pieces together. Then flip them right side out and stuff. I used grocery bags.


Sew the tail feathers to the back of the shirt.


For the pig tail, I sewed a piece of bias tape together. Then I threaded a piece of pipe cleaner down it.


I sewed the tail on and then shaped it  into a little squiggly pig tail!


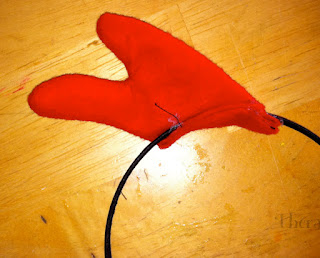
For the head feathers, I used head bands and hot glued the felt feathers onto it. I used the same concept to make the head feathers as the tail feathers, but I didn't stuff the head feathers.


For the pig crown, I used puff paint and put 3 blue dots and 3 white dots.


For the pig ears I painted the inside a lighter pink with puff paint.


For the bomb bird, I painted the top half yellow.


Here is our family of angry birds! I think our costumes are AWESOME and I like them WAY better then the store bought ones.

Thursday, October 6, 2011

Halloween Printable and tutorial

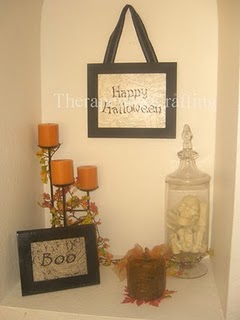
Today I will be offering 2 new printables. The Halloween plates and the happy Halloween sign!

You will need mod podge, vinyl lettering, a frame, and 3 plates.

I don't remember what font I used for the Happy Halloween but I really like it in "house sitter's club, impervious, or claudia jean" These are all free fonts I got HERE. The font I used for the plates was Papyrus.

I realize many do not have a vinyl cutting machine. So, I have found a solution, although it will be a little more work for you:) I created a jpeg that you can print out and use as a stencil to cut out from vinyl or black contact paper with scissors or an exacto blade. Please keep in mind you will have to size the file to fit your plates and frame.

8x10 frame

plates


First download the following 4 files.
Definitions #1
Definitions #2
Definitions #3
Definitions #4

I printed them off at home on regular paper with and ink jet printer. I think I made 5 copies of each file. Maybe more. Next, you will rip the paper into little pieces. There is no method to it. Smaller pieces work best. I liked it better with more words showing and less empty space. Here is a close up of the background.  See the open spaces with less writing, I don't like it, but I like it where there is lots of writing.


FRAME:
Take out the glass from the frame:) Arrange the pieces of paper onto the glass, mod podge as you go. After the entire piece of glass  is covered with the words, put your vinyl lettering on. Then spread a thin layer of mod podge over the entire thing. Place back in the frame and hot glue a cute ribbon onto the back. Hang up and enjoy!

PLATES:

Cut out a circle the same size as the center of the plate. I used light weight card stock. Mod podge the torn pieces onto the paper. After the entire circle is covered, cut of the excess that might be hanging over the circle. Put a thin layer of mod podge onto the back of the circle and place in the center of the plate. Smooth out any bumps or bubbles. Place another plate on top and add weight. Leave the plate to dry over night. Place the vinyl onto the circle and spread a small layer of mod podge on top.

Monday, October 3, 2011

Problem Solved

***Today is the last day to enter the vinyl giveaway! Get more details HERE***

My neighbor was lamenting to me that her daughter always looses her cute hair accessories at school. The problem, the clips never stay in her hair. My sisters have mentioned the same thing to me in the past. Their solution was to put a clear rubber band at the end of the clip to keep it closed. So, my neighbor said she no longer put them in her hair. She always tells me how cute my little woman's hair is with the cute flowers or bows. So, I got to thinking about a way to solve that problem. EASY!

So I made some flowers, BUT instead of putting them on a clip, I sewed a piece of ribbon onto the back.
Next I got a rubber band and tied the flower onto the rubber band. Make sure to use a bowline knot so the ribbon will not come undone. You can watch a tutorial HERE. Knot it really tight. Then trim off the ends and fray check the end of the ribbon.

Here are a matching pair for pig-tales I made for my daughter.

Here is my daughter's usual attire. There is always play jewelry, wands, and tutus involved. I think she might be a "fancy Nancy". I have officially stopped trying to get her to wear something else to the store because it just isn't worth it. ANNNNNNDDDDD I think she looks really cute:)

Friday, September 2, 2011

The perfect Bag Tutorial

Well here is the tutorial for THIS bag I made for my sister.


You will need the following amounts from 3 contrasting fabrics.
Fabric #1: (The main fabric for the bag) 1 yard
Fabric #2: (fabric for the ruffle, underside of handle, and pockets inside) 24 inches
Fabric #3: (lining of inside of bag) 1/2 yard

Ideas for fabric choices: you can choose anything, but if you use a light weight fabric then you will have to line every single piece with the heaviest interfacing you can find. I used cotton with THIS bag and after using interfacing, the bag held it's form very nicely. If you use decor fabric, then you will only line the outside of the bag and one side of the handles with interfacing.

Cut the following pieces out
Fabric #1:
2 pieces @ 20 X 18 main body
2 pieces @ 3 X 30 outside of handles
1 piece @ 20 X 11 outside pocket

Fabric #2:
2 pieces  @ 3 X 30 inside of handles
2 pieces @ 20 X 10 inside pockets
1 piece @ 6 X length of fabric (mine was 42 inches) ruffle

Fabric #3
2 pieces @ 20 X 17 lining

Iron on the interfacing to all of the pieces cut from fabric #1

HANDLES:
Using the 2 contrasting fabrics (cut at 3 X 30), put RST (right sides together) and sew down the length of both sides of strap. DON'T sew the short ends closed. Do this for both handles.

Flip right side out and press out the seam OR I think it's easier to lick my fingers as I go and push the seam out because it gives me better grip and control of the fabric.

 Then I pin in  place as I get the seam pushed out.

Top stitch down the length of the handle on both side.


POCKETS:
(I purchased this fabric along time ago for really cheap. I didn't have enough of my fabric #1 to make a pocket on the outside of this bag, so I am going to show you how to make the pocket using my inside fabric. You will use the same method for all of your pockets)
fold the top over 1/4 inch and press, the fold over 1/4 inch again and press. Sew in place.

Place the bottom of pocket even with the bottom of the main fabric.  Measure in 6 1/2 inches from both outer edges and mark. I used photoshop to turn my marks black so you can see them, but I used a white marking pencil. You could also use disappearing ink. Sew a line down the front, connecting the marks.When finished you should have sewn 2 lines and the makings of 3 pockets.
RUFFLE:Fold over the edge 1/2 inch on both sides.


Gather both sides. Place the gather 6 inches from the top of the main fabric. Pin in place and be extra careful to make sure the ruffle is pinned on straight.

Line the edge of foot up with the edge of ruffle and sew ruffle in place.


LINING:
Make the pockets for the lining the same way you did above under pockets. With RST, SEW JUST THE 2 EDGES of bag together.

On the bottom of the lining, make a reinforced hole at the bottom for turning the bag. Start about 3 inches from the center and back stitch 4 or more times. Then sew the rest of the bottom closed.


SNAP CLOSURE:
Find the middle of the bag. Measure 1 1/2 inches down from top and mark. Measure 1/2 inch down from the mark you just made and mark. Mark 2 centimeters on the left and right of cent. You should have a mark that looks something like this.

 Create 2 button holes along the 2 lines on either side of the center of bag.
Using a sharp seam ripper, open the 2 button holes you just made.

Put your snap closure in place.


 OUTSIDE of BAG:

RST, sew the sides and bottom. These next pictures are going to show you how to get a square bottom for you bag to sit better. Start at one corner.
 Pinch the corner into a triangle.
 Sew a line 2 inches down from tip of triangle.
 Cut off the top.
 Flip right side out and your bottom of bag should look like this now.
Measure 1 1/2 inches in from edge and pin the handles with the main fabrics facing each other. Do this on both sides.
With RST, place the outside of bag into the lining

 Line up the edges and pin into place. Then sew around the entire top of bag.

Turn the bag right side out by bringing it through the hole you left when sewing the lining.

Now, sew the hole closed at the bottom of your lining.


Press the seam out and top stitch around the top of the bag.


You are finished! You should now have an amazingly perfect bag with 3 pockets on the outside and 6 pockets on the inside!
 
Designed By Aqua Poppy Designs for Therapeutic Crafting.
© Copyright. All Rights Reserved.