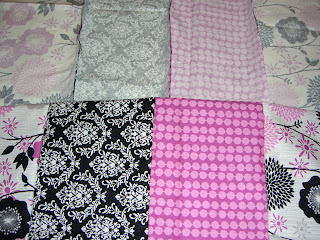
This is what I did. I used
***Note: This is for a size children 3. If you are making it bigger, take the length you want the dress to be (starting at collar bone) and divide it by 4. This will give you the width you need to cut out your strips.***
Now, from 3 different fabrics, cut out your strips. Mine were 6 X 45 inches.
I wanted the dress to go below my daughter's knees so I added length. Arrange them in the order you want them to be.
Sew the strips together length wise.
Fold left salvaged edge just big enough for pattern to fit. Do the same for right salvaged edge.
Placing piece on fold, cut out 2 body pieces.

I cut mine out bigger than the pattern because I want a little gathering in the front. You can stay the same size as pattern or cut out about 1 inch wider around pattern piece.
You will need 4 collar pieces from main fabric and 2 from interfacing. 2 sleeve pieces form the main fabric. Notice what the sleeve looks like!?! I used a pattern for this sleeve, but I found a tutorial HERE for this type of sleeve. It's just 1/2 of an oval. After looking at her tutorial, I will be doing my sleeves like that from now on, it looks for finished:)
It will just cover your daughters shoulders. Also, from one of the accent fabrics, cut out a 4 X 45 inch strip.
Iron the interfacing onto the wrong side of collar pieces. Sew shoulder pieces together.So you now have 2 separate squares (as seen below) With RST Sew the inside of the squares together. Clip corners and flip right side out. Top stitch.
RST sew the sides of the body of the dress together. Make sure the lines of each fabric line up.
Gather the top of dress until it fits the length of the collar.
Pin RST of collar to top of dress where you just gathered.
Flip dress right side out. Your dress is starting to take form:)
Make bias tape out of main fabric. Cut a 1 1/2 inch strip of fabric. Press in half
Open and fold edge to middle. Repeat process for both edges.
Fold in half again and press. You just made bias tape.
Fold ends in and top stitch.
Pin onto the bottom of the under arm of dress. Top stitch into place.
Finish curved edges of sleeve by folding over 1/4 inch press, fold 1/2 inch and sew in place. I surged the edges and folded over once.
Gather straight edge of sleeve
Pin to upper part of arm hole. Gather sleeve until it fits length remaining.
Stop each end at bias tape. Sew sleeve on to dress.
Top stitch sleeve and keep from flipping up.
Hem the bottom of dress by folding over 1/4 inch and press. Fold over again 1/2 inch and sew.
Create the bow by sewing RST. Leaving one end open for turning.
Turn right side out and press flat. Fold open end in and top stitch around the entire piece.
Tie into the bow size you want and attach to dress.
Then put the dress on your little lady and take pictures of her in her new adorable dress:)


5 comments:
This dress is darling! Great job!
Beautiful I will make one this week!!! Thank you for the tutorial!
ohhhhh i love it another project added on to the millions of other stuff to accomplish :) thanks for sharing
Amanda @ http://patriciaraedesigns.blogspot.com/
Can't find the link for the sleeve part of the pattern. can you direct me to it? been wanting to make a sleeve like this for a long time.
Great tutorial!!!
I linked this on my blog.
I got very wonderful idea of making dress of niece by this.
Post a Comment