Let me give you a tour of my car of spending so much time in it with 2 kids- by myself I might add. Hubby didn't come on this trip.
Here is my stash of food and toys to hand to the kids when ever they got restless. It worked like a charm. My kids do AMAZING on the ride.

Toys and food got tossed to the floor once the kiddos tired of them.

I gave all my presents to my preggy sister so I can now officially post the pictures. Let me show you what I have been up to.
I put silky blue material on the other side. My kiddos LOVE silky, so I felt my nephew HAD to have silky too! I put an owl applique on front using THIS pattern.

Here is the front. At the time I took the picture, I couldn't find the green ribbon I was going to use to make the straps. The orange and white polka-dots is where the straps are going to be attached. The ribbon had a button hole and a button which you wrapped around the handle so the baby stayed covered, but you could still grab the handle. I used THESE instructions.

I made a little baby cozy. I got the idea from HERE. I just used 1 yard and cut the fabric out to the shape in the picture. I had to sew a 8 inch strip in the middle to make it bigger, but I think it just added to the charm of the blanket.

You fold the bottom over the feet, and wrap the 2 sides around so the baby is in a little cocoon. Notice, the same owl applique. I was going for matching. I think this one was cuter.

Applique onesies. A tie, airplane, rocket, and argyle. I made the airplane and argyle up and the pattern for the tie, guitar (on bib) and rocket can be found HERE and HERE (note: you have to download the rocket pattern by clicking on the page on right side of screen).

A guitar bib. It has a plastic covering so it can just be wiped off. Plus, I put 3 snaps so it can be adjusted as the baby grows.

I covered this cute little diaper wipe case and made a diaper caring case, using THESE instructions from Make it and Love it.

This is the inside lining of the diaper case.

I made 2 bags. My preggy sister got to choose which one she liked best.
This is bag number 1. I embellished the outside with a ribbon that wrapped around the hole bag and ended with a big bow.

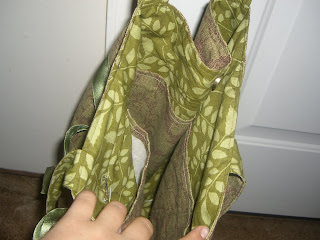
This is the inside. Both bags have the same inside.

This is bag number 2. I just used 2 place mats for the outside. The base is some thick brown fabric. I added a liner, handles, a snap closure, and the cute flower. The handles were super easy. I just used 4 D-rings and 8 eyelets. The eyelets were used to secure the D-rings. Plus, it adds some character to the bag.


4 comments:
whoa Brenda! That is some serious gift-age :) What a great sister you are! And such fun baby projects...after Christmas I will have to get busy on some of these cutie ideas! You are quite the crafty mama!
Love these! I wish I could sew, appreciate your gift! I especially love the owl car seat cover. One-of-a-kind and super cute!And kudos for surviving that drive. That's killer! I live in UT but I'm from Missouri, not a fun drive either.
Lissa @ mythriftytreasures.blogspot.com
WoW! You are quite the seamstress! I haven't sewn in 5 years and even then wasn't much good at it. I signed up for Sew Something in Nov and have yet to blow the dust off the sewing machine!
Dena
Holy moly woman! That is a lot of work. I'll bet your sister was in heaven! All your projects look amazing!! My car looks like and we never travel:)
Thanks for linking!
~Andy @ Poppies@Play
Post a Comment